QuickBooks Accountant 2013 Batch Enter Transactions
by Laura Madeira | October 15, 2012 9:00 am
 [1]Accounting professionals who want to work more efficiently and profitably when providing write-up services for their clients will want to be very familiar with the new Batch Enter Transactions feature in QuickBooks Professional Bookkeeper 2013[2], QuickBooks® Accountant 2013 and QuickBooks Enterprise Solutions[3], all editions.
Use the Batch Enter Transactions for adding the following transaction types to a QuickBooks data file:
- Checks
- Deposits
- Credit Card Charges or Credits
With Batch Enter Transactions feature you can:
- Enter transactions in batch on a screen designed for power data entry.
- Paste over 1,000+ transactions from Excel and save all at once.
- Enter after-the-fact transactions easily into a customizable data entry grid.
- Choose from multiple data fields and which order to display the columns of data.
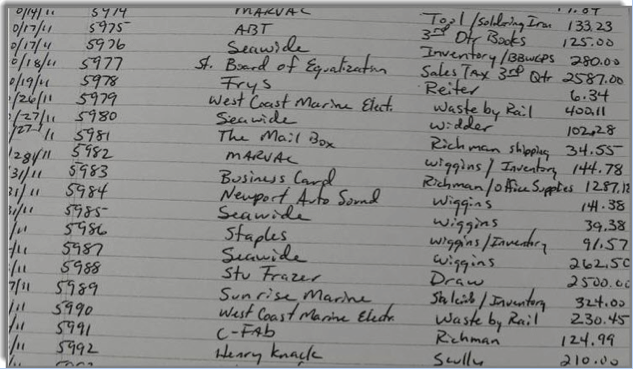
Save hours of time entering multiple transactions, such as those from handwritten documents.
 [4]
[4]
Here’s a short video to view this feature in action:
Follow these few steps for using the new Batch Enter Transactions feature:
Step 1: Launch Batch Enter Transactions from the Accountant Center or the Accountant menu.
Step 2: Select the desired transaction type from checks, deposits, credit card charges or credits.
 [5]
[5]
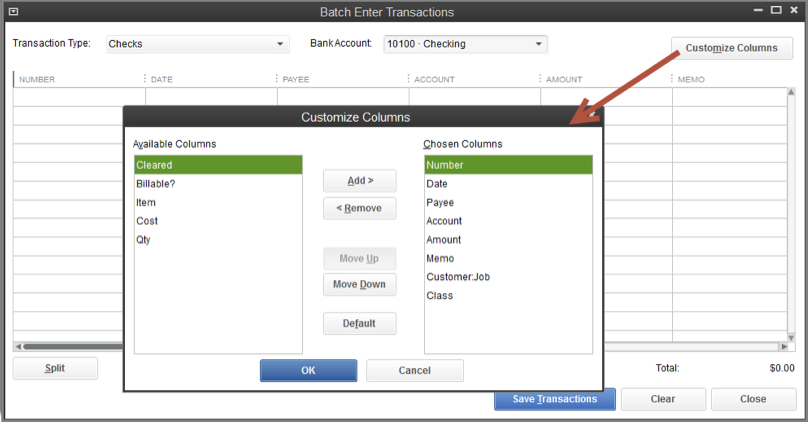
Step 3: Click Customized Columns to display the columns of data desired and to rearrange the order of the columns.
 [6]
[6]
Step 4: Begin typing data into the Batch Enter Transactions grid. QuickBooks will automatically populate the next incremental transaction number.
 [7]
[7]
Step 5: Optionally, copy Excel data to the clipboard (using any common Excel copy functionality include right-clicking and selecting copy or highlighting cells of data and selecting the Ctrl + C on your keyboard).
 [8]
[8]
Caution: Make sure your columns of data in the Batch Enter Transactions dialog match the cells of data you are copying in Excel. If you are not using account numbering, you will need to type the name of the account exactly as it is in QuickBooks. If the account, name or item is not found in the file you will have the option to add it to the respective list.
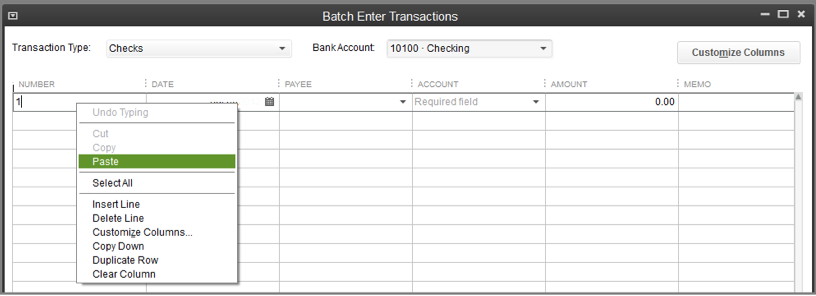
Step 6: On the Enter Batch Transactions dialog box, right click with your cursor in the field you want to populate. In the image below, I have selected the top left cell and after selecting Paste from the right click menu, the data from Excel will prefill the grid.
 [9]
[9]
Tip: For the best experience using Excel’s copy and paste, make sure your Excel file has data in each field.
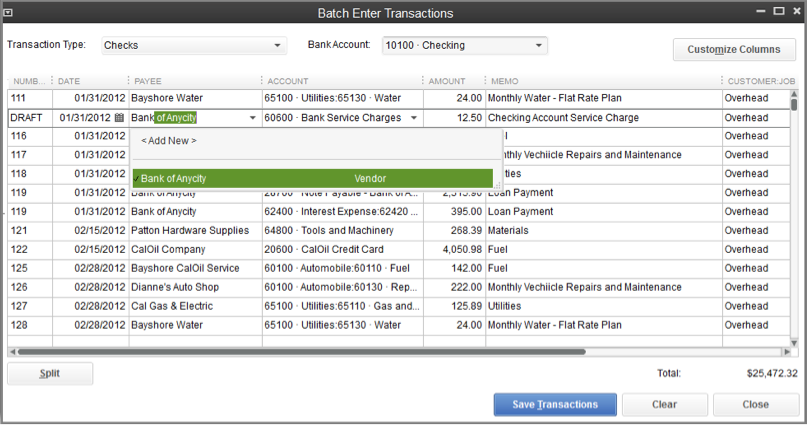
Step 7: For any fields with missing data, begin typing the proper information for the field. The field displayed below is the Payee so QuickBooks will display available names in the list.
 [10]
[10]
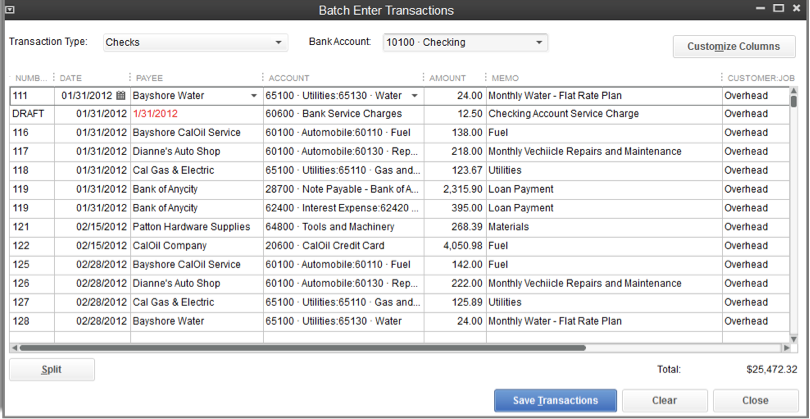
Note: In the lower right you can see the total of the transactions to be saved and compare with your original source documents.
Step 8: Review the data before importing. If any field in the Excel worksheet was left blank, QuickBooks defaults the empty field with data from the column to the left and highlights the text in red. Each field has different characteristics, be sure to review these and make changes as needed.
 [11]
[11]
Step 9: Click the Save Transactions button and QuickBooks notifies you of the number and type of transactions saved to your QuickBooks file.
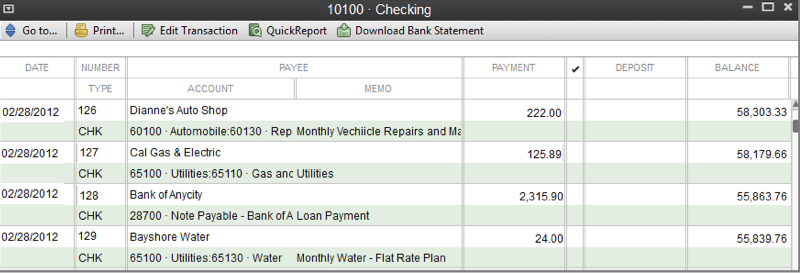
A quick review of your checkbook register shows the added transactions.
 [12]
[12]
Now, wasn’t that easy! Accounting professionals providing write-up work can be more profitable by working more efficiently.
Intuit Accountant News Central[13]
- [Image]: http://www.quick-training.com/wp-content/uploads/2012/10/QB13PremAE_3D2.jpg
- QuickBooks Professional Bookkeeper 2013: http://accountants.intuit.com/accounting/quickbooks/bookkeeper/?s_cid=NewsCentral&s_ev8=NewsCentral_MoreProductive_LMadeira_QB13Batch_10_19_12_QB1025
- QuickBooks® Accountant 2013 and QuickBooks Enterprise Solutions: http://accountants.intuit.com/accounting/quickbooks/accountant/
- [Image]: http://www.quick-training.com/wp-content/uploads/2012/10/Batch1.png
- [Image]: http://www.quick-training.com/wp-content/uploads/2012/10/Batch2.png
- [Image]: http://www.quick-training.com/wp-content/uploads/2012/10/Batch3.png
- [Image]: http://www.quick-training.com/wp-content/uploads/2012/10/Batch4.png
- [Image]: http://www.quick-training.com/wp-content/uploads/2012/10/Batch5.png
- [Image]: http://www.quick-training.com/wp-content/uploads/2012/10/Batch6.png
- [Image]: http://www.quick-training.com/wp-content/uploads/2012/10/Batch7.png
- [Image]: http://www.quick-training.com/wp-content/uploads/2012/10/Batch8.png
- [Image]: http://www.quick-training.com/wp-content/uploads/2012/10/Batch9.png
- Intuit Accountant News Central: http://blog.accountants.intuit.com/?p=17938
Source URL: http://www.quick-training.info/2012/10/15/quickbooks-accountant-2013-batch-enter-transactions/