Editing an Existing QSW Supporting Document in QuickBooks
by Laura Madeira | October 22, 2012 9:00 am
You might find it necessary to edit the text or fields in an existing QSW supporting document. You can access the Microsoft Word .dot templates directly from a QSW Report or you can browse to the stored templates directly from within Word. To edit an existing QSW supporting document, follow these steps:
1. Launch the QSW tool from within QuickBooks.
2. From the Document Actions pane, Statement Properties, click the Documents button.
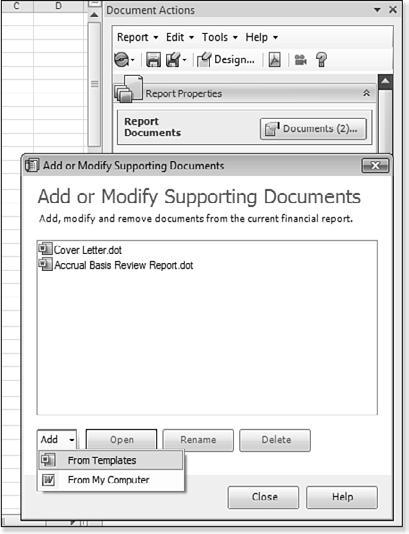
3. A list displays any supporting documents currently assigned to this QSW Report (see below). Select a supporting document then click the Open button and skip to step 8. If no supporting documents are listed, go to step 4.
 [1]
[1]View, add, open, rename, and delete supporting documents.
4. Click the Add button, and select From Templates.
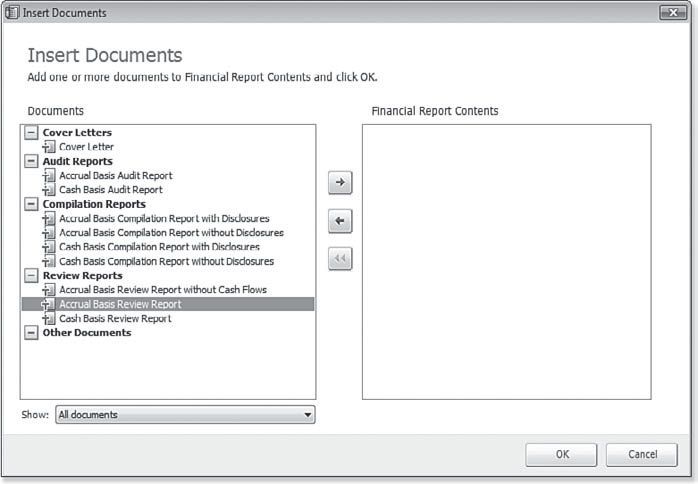
5. The Insert Documents dialog box displays as shown below. Select a specific document and in the center of the window, click the arrow pointing to the right to add the selected document to the Financial Report Contents pane.
 [2]
[2]Insert ready-made supporting documents or those you created.
6. Optionally, select Show > All Documents > Intuit Documents > Custom Documents or Custom Template Groups to filter for specific documents to choose from.
7. Repeat step 5 until you have added the necessary documents to your QSW report. Click OK to close the Insert Documents dialog box. The Add or Modify Supporting Documents dialog box displays with a list of added documents.
8. Click the Rename button if you want to give the document a new name for this QSW report.
9. Click the Open button. QSW opens the .dot template in Microsoft Word.
10. Edit the text as needed using Word’s editing functions.
11. To add or edit merged data fields in Word 2003, select the QSW Toolbar. For Word 2007 and 2010 users, click the Add-Ins ribbon.
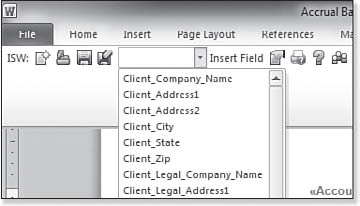
12. With your mouse in the location on the document where you want to add the merged field, select the desired field from the Insert Field drop-down menu as shown below:
 [3]
[3]Add QuickBooks data fields to customized document templates.
13. When you are finished with your edits on the QSW Toolbar, click the Save button to save over the original document. Click the Save As button to save the document with a different name.
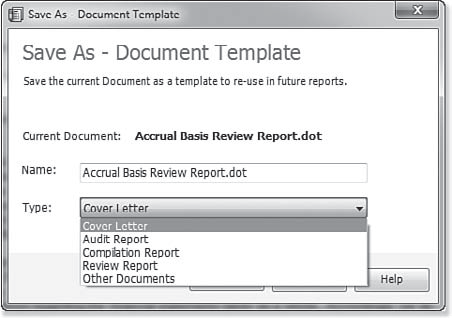
14. When you click Save As, the Save As—Document Template dialog box displays. Provide a Name for the template and choose a Type from the drop-down list as shown here:
 [4]
[4]Save your new supporting document as a template to be used with other client files.
15. Click OK to close the Save As—Document Template dialog box.
From Laura Madeira’s QuickBooks 2012 In Depth[5].
- [Image]: http://www.quick-training.com/wp-content/uploads/2012/10/9780132939829b20.bmp
- [Image]: http://www.quick-training.com/wp-content/uploads/2012/10/9780132939829b21.bmp
- [Image]: http://www.quick-training.com/wp-content/uploads/2012/10/9780132939829-b231.bmp
- [Image]: http://www.quick-training.com/wp-content/uploads/2012/10/9780132939829b24.bmp
- QuickBooks 2012 In Depth: http://www.quick-training.com/quickbooks-2012-in-depth/
Source URL: http://www.quick-training.info/2012/10/22/editing-an-existing-qsw-supporting-document-in-quickbooks/