This report is one of the most useful to you as you research your bank reconciliation errors. You might want to memorize this report so it can be reviewed again if needed. To create an uncleared bank transactions report, follow these steps:
1. From the menu bar, select Reports > Custom Reports > Transaction Detail. The Display tab of the Modify Report dialog box opens. In the Report Date Range box, select All Dates. If you have more than one bank account, in the Total By drop-down list, select Account List to keep each bank account with separate totals. From the Columns box, select the data you want to appear in the report.
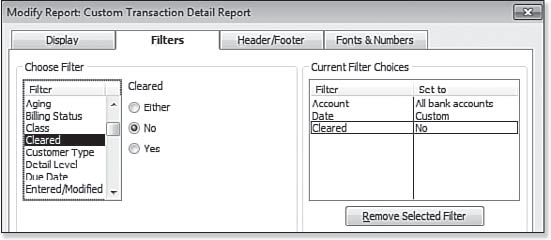
2. Click the Filters tab. In the Choose Filter box, with Account highlighted, select All Bank Accounts. Scroll down the Choose Filter list and select Cleared, and then click No next to the list, as shown here:
3. This report will be useful to you in the future, so go ahead and give it a specific name by clicking the Header/Footer tab and changing the Report Title as desired.
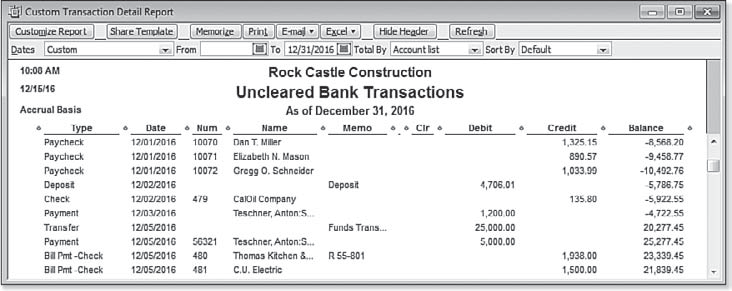
4. Click OK to create the report. See below:
5. Optionally, click Memorize to have QuickBooks store the report for future use. QuickBooks asks you to provide a name for the report.
6. Click OK to save the memorized report.
Memorizing customized reports for later use is easy. First, make sure your Dates selection is appropriate. If your Dates selection is Custom, each time you create this report, it uses the custom dates. Selecting Dates, such as the generic This Month-to-Date or any of the other choices, makes the memorized report more valuable in future months. With the report displayed, click Memorize. QuickBooks stores the report with the header name or you can rename it.
tip
Another option is to add this report to your icon bar. With the report displayed, select View > Add (name of report) to Icon Bar.
For more helpful tips, see Laura Madeira’s QuickBooks 2012 In Depth.


