 Yep, we QuickBooks users are set in our ways. We are attached to our easy-to-learn and easy-to-use QuickBooks software, so when Intuit changed how the software looked, we complained. It’s a personal thing. Change in general is just plain hard to take – and there is no exception to this feeling even when working with software.
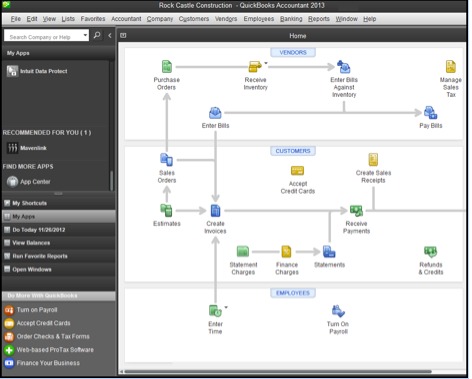
QuickBooks 2013 saw a dramatic change to its color scheme. The user interface change was designed to help users focus on the immediate task at hand with all other activities not as prominently displayed. What was heard loud and clear by Intuit was that we missed our colored icon bar at the top of the home page.
With Maintenance Release 4, Intuit has raised the bar with its quick response to this and other customer-requested enhancements, so don’t wait, go get it! It’s a free download. Details are provided at the end of this article.
Here’s a visual perspective of these new changes:
http://www.youtube.com/watch?v=XA-Z4DZpOwE
So what exactly did Intuit improve in QuickBooks 2013 after listening to the customers?
Alternate Top Icon Bar
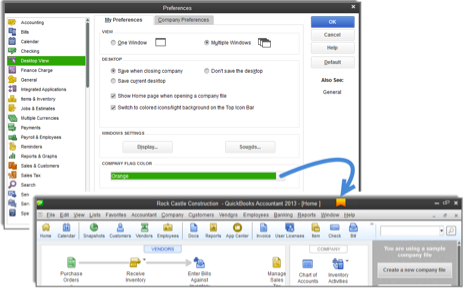
With Maintenance Release 4, an alternate Top Icon Bar is available by choosing a preference to return to the colored icons and light background as shown below:
After updating your file to R4, follow these steps to turn on the alternate Top Icon Bar:
- From the menu bar select, Edit, Preferences, Desktop View, My Preferences tab.
- In the Desktop section, place a checkmark in the Switch To Colored Icons/Light Background On the Top Icon Bar.
- Click OK, to close the preferences dialog. The Top Icon Bar now displays in color!
This is an individual preference, so for companies with multiple users accessing the same file, each user can choose from the alternate Top Icon Bar displayed above, or between the default Top Icon Bar or Left Icon Bar displayed below. Access these choices from the menu bar by selecting View and choosing your option.

Default Top Icon Bar with Darker Background
Note: The color enhancement is presently only available for the Top Icon Bar.
File Differentiation – Colored Flags
Many QuickBooks users manage multiple QuickBooks files, and in previous versions of QuickBooks, you could change the overall color scheme of the data file. Now, in Maintenance Release 4, you can choose to assign a unique Company Flag Color to the title bar of each QuickBooks file.
After updating your file to R4, follow these steps to assign a Company Flag Color:
- From the menu bar select, Edit, Preferences, Desktop View, My Preferences tab.
- In the Company Flag Color section, from the drop-down list select a preferred color for the flag.
- Click OK to close the preferences dialog. The selected data file now has a flag displayed in the title bar.
Improved Readability
Intuit listened closely to users request to improve the readability of the new design. Included in R4 are these additional improvements:
- Sharpen & darken edges of input fields, icons
- Darken field labels
- Improvements to the Ribbon tool bar labels, icon sizes, hover and gradient styling
- Pay bills background changed from white to gray
- Total field data in transaction forms now display by default in upper case (ALL CAPS)
- Color differentiation in vendor bill and write check transactions
- Dynamic resizing of grey bar (transaction forms)
QuickBooks Software Updates
The changes discussed in this article require that you update your QuickBooks data file to maintenance release 4.
After a version is released, changes, improvements and fixes are provided in the form of a “maintenance release.” Often, Intuit offers the release as a manual download before offering it as an automatic update due, in part, to additional testing of the update. As a result, you may want to wait until any maintenance release is done through an automatic update.
To choose how QuickBooks detects whether a maintenance release exists, follow these steps:
- From the menu bar, select Help, Update QuickBooks.
- The Overview tab displays on the Update QuickBooks dialog box. Read the provided information. Optionally, click Update Now if you want to complete the task.
- Click the Options tab and select from the following:
- Automatic Update – If you select Yes, QuickBooks automatically downloads the update and provides a dialog box for you to install the update the next time you launch QuickBooks.
- Shared Download – If you work with multiusers accessing QuickBooks, you should select Yes to share the download with the others. This will save time and ensure that other users can access the newly updated file.
4. You can then choose which updates to install:
- Payroll, Federal, Forms Engine
- Employee Organizer
- Maintenance Releases
- Help and Other Updates
5. Click Save when you have made your changes, Revert to return to the original settings, or Close if you have not made any changes. Optionally, click Help for more guidance.
6. Click the Update Now tab. From this tab, you can choose which updates to install, learn when they were last checked, and view the status.
7. Optionally, select the Reset Update to reinstall the entire update or select Get Updates
8. A progress message displays. Click Close when finished.
To confirm that the newest maintenance release installed, you may need to close QuickBooks and relaunch the software. You can also check the product information window from an open QuickBooks file by selecting F2 or pressing Ctrl+1 on your keyboard; then you can read the Product line at the top.
Keep the feedback coming! Intuit is listening and improving the product for us. From the menu bar in QuickBooks select, Help, Send Feedback Online and choose from Product Suggestions, Bug Report or Help System Suggestion.
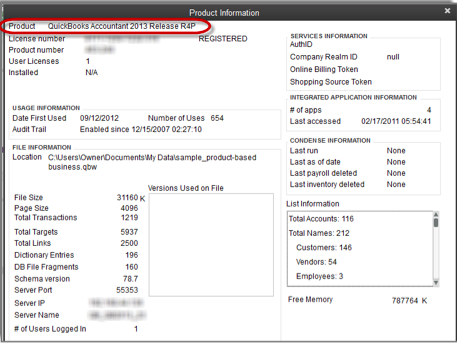
Select the F2 Key to View Your Current Maintenance Release Number
This article first appeared on Intuit Accountants News Central, be sure to subscribe for up to date information on QuickBooks and other business practice topics!


