Setting Up Sales Tax in QuickBooks
by Laura Madeira | April 3, 2013 9:00 am
In QuickBooks you can collect and remit sales tax on behalf of governmental authorities. To do so, you need to establish sales tax items and codes. You might also need to create sales tax groups.
Do not forget to register with the department of taxation for the state(s) you will be selling in. Each state has specific rules and guidelines, as well as providing you with a unique filing identification number for your business. Not all states require sales tax to be charged to your customers on specific items sold. To see if the taxing authority has special guidelines to follow, call their sales tax department; my experience is they are quite helpful and can direct you to the needed documentation.
Creating Sales Tax Items
Sales tax items are used to identify specific rates charged to your customers and the tax authority vendor to which you remit the sales tax. You might have one sales tax item, or several, on your item list.
After enabling Sales Tax in preferences, to create a sales tax item in your data file, follow these steps:
- From the menu bar select Lists, Item List.
- In the Item drop-down list, select New to open the New Item dialog box.
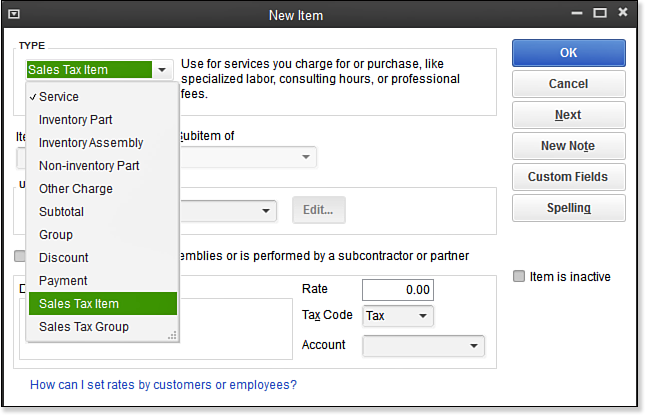
- In the Type drop-down list, select Sales Tax Item as shown here:
 [1]
[1]Sales tax is properly calculated and tracked in QuickBooks when you use the Sales Tax Item type.
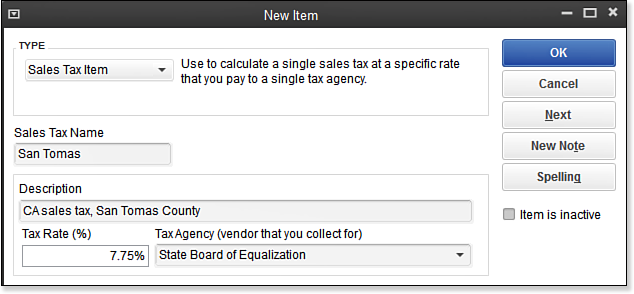
- Enter a sales tax name for the sales tax item; the name should identify the applicable jurisdiction. See image below:
 [2]
[2]Setting up your sales tax item with the proper rate and vendor ensures that you collect and remit sales taxes correctly.
- Enter a Description you want printed on the customer’s invoice.
- In the Tax Rate (%) box, enter the rate the taxing authority charges.
- In the Tax Agency (vendor you collect for) drop-down list, select the vendor to which you remit your sales tax payments. If your vendor is not set up in QuickBooks, select Add New at the top of the list to create a sales tax vendor record.
- Click OK to save the sales tax item.
With sales tax items created, you can group them into sales tax groups if the state requires collection and reporting on multiple tax entities.
Here’s an additional tip from Laura Madeira’s QuickBooks 2013 In Depth[3]:
Each state has different requirements and rates for reporting sales tax. It is critical you research the applicable regulations and set up QuickBooks correctly. Otherwise, your business can be subjected to expensive—and avoidable—penalties.
From Laura Madeira’s QuickBooks 2013 In Depth[3]
- [Image]: http://www.quick-training.com/wp-content/uploads/2013/03/9.19.bmp
- [Image]: http://www.quick-training.com/wp-content/uploads/2013/03/9.20.bmp
- QuickBooks 2013 In Depth: http://www.quick-training.com/quickbooks-2013-in-depth/
Source URL: http://www.quick-training.info/2013/04/03/setting-up-sales-tax-in-quickbooks/