How to Use the Payroll Checkup Diagnostic Tool in QuickBooks
by Laura Madeira | May 22, 2013 9:00 am
After you complete payroll setup and you have created payroll checks, or year-to-date entries in QuickBooks, you are ready to review your data using the Run Payroll Checkup diagnostic tool. This feature is similar to the Payroll Setup feature. In fact, when you open the Run Payroll Checkup diagnostic tool, it also opens the Payroll Setup feature, but some of the menu choices are different.
What makes the Run Payroll Checkup tool different from the Payroll Setup tool? After you have set up your payroll, you will most likely use the Run Payroll Checkup tool to diagnose errors with setup and transactions.
The QuickBooks Run Payroll Checkup enables you to “Finish Later” and return where you left off. Before you begin the Run Payroll Checkup dialog box, make sure you have the following information available in case any of it is missing, or incorrect:
- Employees’ names, addresses, and Social Security numbers.
- Compensation, benefits, and other additions or deductions your company offers.
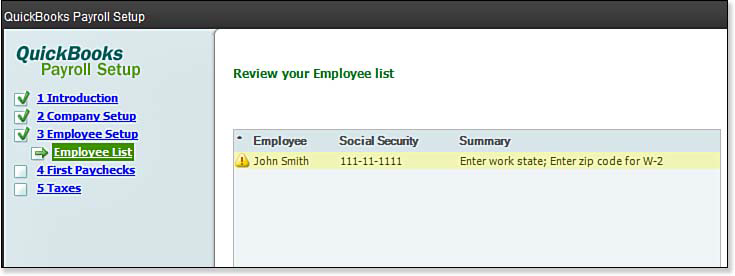
- Missing or incomplete information when you originally set up the employees. See below:
 [1]
[1]The QuickBooks Payroll Setup detects any setup errors or missing information.
- Compensation items, other additions, and deductions for missing or incomplete information.
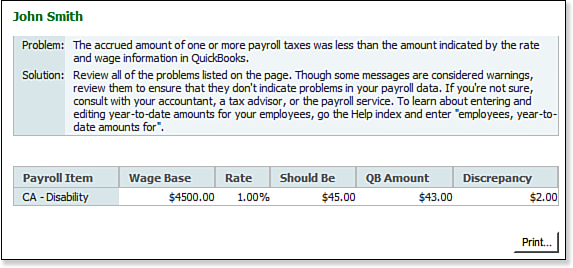
- For existing data, review of actual wage and tax amounts provides an alert if any discrepancy is found, as shown here:
 [2]
[2]QuickBooks Payroll Setup detects certain payroll tax computation errors.
Before we get started, here’s an important tip from Laura Madeira’s QuickBooks 2013 In Depth[3]:
The Run Payroll Checkup diagnostic tool is optional for Intuit’s Basic or Enhanced Payroll subscribers. However, I recommend you process the Run Payroll Checkup regardless of what payroll subscription you select. Using the tool as often as once a quarter before preparing quarterly payroll tax returns can help ensure your data is correct.
Be prepared to take the time to fix the errors that are detected. The QuickBooks Run Payroll Checkup diagnostic tool allows you to ignore warnings, but doing so might result in additional payroll calculation errors.
How to Use the Payroll Checkup Diagnostic Tool
To have the payroll diagnostic tool in QuickBooks review your payroll setup for missing information and paycheck data discrepancies, do the following:
- From the menu bar select Employees, My Payroll Service, Run Payroll Checkup. Follow each of the dialog boxes, clicking Continue through each step.
- In the Data Review dialog box, click Yes. QuickBooks reviews the wages and taxes in the payroll records.
- If errors are detected, click the View Errors button. QuickBooks opens the error detail, as shown above.
- Click the Print button in the Payroll Item Discrepancies dialog box.
- If you click the Continue button, some errors will require you to fix them before you can proceed.
- Click the Finish Later button to close the Run Payroll Checkup diagnostic tool, so you can create correcting entries.
Using the errors displayed earlier, as in the example in the above image, the following are the typical steps for correcting them. (Your errors will be different and might require adjustments to other types of payroll items than the ones detailed here.)
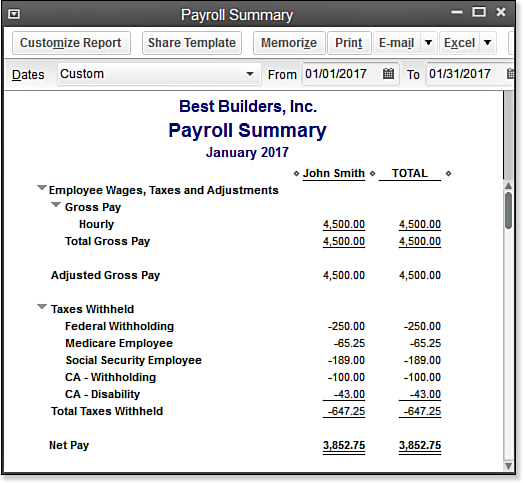
- From the menu bar select Reports, Employees & Payroll, Payroll Summary. Review this report for either prior or current payroll quarters (depending on where the error was detected). Compare the Payroll Summary report (pictured below) to the Payroll Item Discrepancies report (shown above). The Should Be amount should equal what your Payroll Summary report shows when prepared today.
 [4]
[4]The amounts included in the Payroll Summary report should match the Should Be amounts in the Payroll Item Discrepancies report. In this example, the Payroll Checkup calculated this amount to be $43.00.
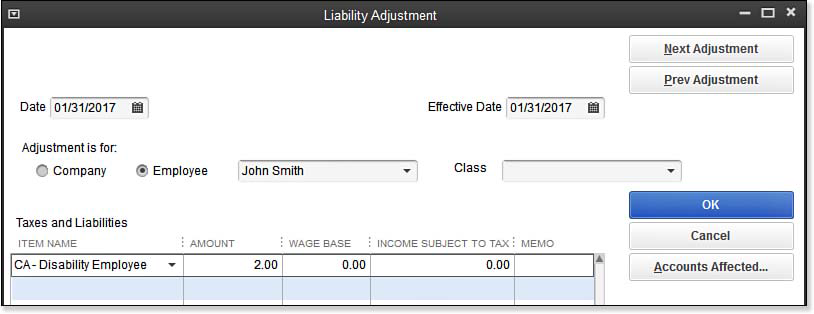
- From the menu bar select Employees, Payroll Taxes and Liabilities, Adjust Payroll Liabilities as shown here:
 [5]
[5]Create a liability adjustment to correct any errors found in the Payroll Item Discrepancies report.
- Enter the Date and Effective Date. Both should be dated in the quarter you want to effect the change.
- Select either Company or Employee for the adjustment. Company indicates it is a company-paid adjustment. Employee indicates an employee-paid adjustment and affects W-2 reported amounts.
- (Optional) Assign a class if your business tracks different profit centers.
- Click Accounts Affected only if you do not want the adjustment to affect liability and expense account balances. This would be necessary if your Balance Sheet is correct, but the Pay Scheduled Liabilities balances in the Payroll Center are incorrect. Click OK to close the Accounts Affected dialog box if displayed.
- Click OK to save the transaction.
- Return to the Run Payroll Checkup menu to review your payroll data again after the correction. If your adjustments were successful, QuickBooks displays a Congratulations message showing all adjustments have corrected the discrepancies.
A word of caution from Laura Madeira’s QuickBooks 2013 In Depth[3]:
Carefully consider the adjustments that need to be made if they affect a prior calendar quarter you have already filed with the state or federal government. Be prepared to promptly file a correcting return with the appropriate agency when you adjust your QuickBooks payroll data from what was previously reported. Correcting prior quarters can often be the best choice, especially if your data is ever audited.
Do You Need to Run Payroll Checkup for a Prior Year?
If you need to complete a Run Payroll Checkup diagnostic for a prior year, follow these instructions. If you are working in a multiuser environment, ask everyone to log out of the QuickBooks file and close the data file.
Next, change your computer system date to a date in the prior year. When selecting the date, keep in mind how QuickBooks will review and report on “prior quarters” dependent on this new system date.
Run the Payroll Checkup diagnostic; QuickBooks now checks the payroll data that corresponds to the year of your computer’s system date.
Don’t forget to close the file and then reset your computer date to the current date before opening the file again and allowing other users into the system.
You might want to contact your computer hardware professional before changing the system date in a networked environment, because it might impact other running programs.
From Laura Madeira’s QuickBooks 2013 In Depth[3]
- [Image]: http://www.quick-training.com/wp-content/uploads/2013/04/11.10.bmp
- [Image]: http://www.quick-training.com/wp-content/uploads/2013/04/11.13.bmp
- QuickBooks 2013 In Depth: http://www.quick-training.com/quickbooks-2013-in-depth/
- [Image]: http://www.quick-training.com/wp-content/uploads/2013/04/11.14.bmp
- [Image]: http://www.quick-training.com/wp-content/uploads/2013/04/11.15.bmp
Source URL: http://www.quick-training.info/2013/05/22/how-to-use-the-payroll-checkup-diagnostic-tool-in-quickbooks/