How to Add or Edit Multiple Items at Once in QuickBooks
by Laura Madeira | August 14, 2013 9:00 am
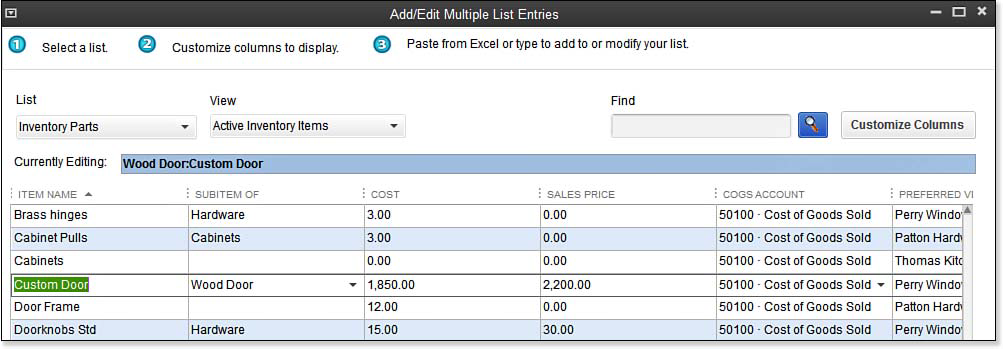
Adding or modifying several list items in a single QuickBooks list can be a daunting task when you have to work with one list item at a time. With the Add/Edit Multiple List Entries feature, shown in the image below, you can add to or modify service items or inventory and non-inventory parts. Using this feature can save you precious time, particularly when you want to add or make changes to multiple items on a list all at once.
 [1]
[1]Use the Add/Edit Multiple Lists Entries to add or modify multiple inventory parts efficiently.
Practice using the Add/Edit Multiple List Entries feature by adding a Custom Door inventory item and customizing the columns of data displayed for editing. Begin by opening one of the sample data files.
- From the menu bar, select Lists, Add/Edit Multiple List Entries.
- In the List drop-down list, select Inventory Parts.
- In the View drop-down list, select Active Inventory Items.
- Click the Customize Columns button on the right to open the Customize Columns dialog box.
- View the fields in the Chosen Columns pane. These fields are currently displayed in the Add/Edit Multiple List Entries grid.
- To add a column to the grid, select Purchase Description and click the Add> button in the center.
- To rearrange the order of the columns, select the newly added Purchase Description in the Chosen Columns pane and click the Move Up button several times until the Purchase Description field is immediately below the Subitem Of field.
- Click OK to close the Customize Columns dialog box.
- Use the scrollbar at the bottom of the Add/Edit Multiple List Entries dialog box to view the fields available.
- Click in the next available blank row in the Item Name field. Or optionally, with your cursor right-click to insert a line and access other features for using this tool.
- In the Item Name field, type Custom Door.
- In the Subitem Of drop-down list, select Wood Door.
- In the Purchase Description field, type Custom Wood Door.
- In the Cost field, type 1,850.00.
- In the Sales Price field, type 2,200.00.
- Accept the default account: Cost of Goods Sold. (Optional) Select Perry Windows & Doors in the Preferred Vendor field.
- In the Income drop-down list, select Construction Income account.
- Accept the default Asset Account: Inventory Asset.
- Type 10 in the Reorder Point field.
- Leave the default Total Value column blank.
- Accept the default Tax in the Sales Tax Code column.
- Skip the Manufacturer’s Part Number field.
- Skip the Qty on Hand field.
- Click Save Changes.
- QuickBooks displays the number of record(s) saved. Click OK, and then click Close.
Here’s another tip from Laura Madeira’s QuickBooks 2013 In Depth[2]: When using the Add/Edit Multiple List Entries tool, use the Tab key on your keyboard to move efficiently from one field to the next. From the grid, you can right-click for other functionality. From the right-click menu, you can choose from Copy Down, Duplicate Row, Clear Column, and other useful features.
To view your newly added inventory item, select Lists, Item List, type Wood Door in the Look For field at the top of the Item List, and press the Enter key on your keyboard. Do you see the newly created Custom Door listed? Click the Reset button to return to the original list. You can also enter your inventory data into an Excel spreadsheet and then copy and paste it into the Add/Edit Multiple List Entries dialog box.
–> A word of caution: When cutting and pasting from Excel, make sure your columns of data in Excel match the order of the Add/Edit Multiple List Entries columns in QuickBooks.
- [Image]: http://www.quick-training.com/wp-content/uploads/2013/07/5.8.bmp
- QuickBooks 2013 In Depth: http://www.quick-training.com/quickbooks-2013-in-depth/
Source URL: http://www.quick-training.info/2013/08/14/how-to-add-or-edit-multiple-items-at-once-in-quickbooks/