When a businesses issues invoices, or statement charges, and expects the customer to remit payment within an agreed-upon number of days you will use the Receive Payment transaction in QuickBooks. When a customer payment is posted to your bank account, will depend on your payment preference settings. You can view details of the many online customer payment methods that work with your QuickBooks file at: Intuit Merchant Services.
If you are interested in accepting credit cards or eChecks from your customers, contact us for special discounts and pricing available to us as an Intuit Premier Reseller. You can reach us as by emailing: news at quick-training.com
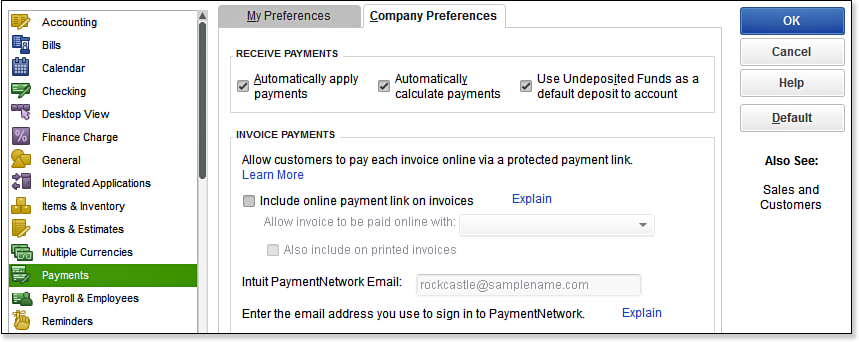
To review your current payment settings, choose Edit, Preferences from the menu bar and select the Payments preference, Company Preferences tab. You will need to be logged in to the file as the Admin or External Accountant User type. See image below:

The Company Preferences for Receive Payments determines how QuickBooks records money received from customers.
–> Note: Does your company accept credit card payments from your customers? Although a discount fee is charged, the benefit can be getting paid more quickly when providing your customers this choice. Intuit offers a Merchant Service that permits your customers to pay online by check or credit card. You can learn more by clicking the Add Credit Card Processing on the Main tab of the ribbon toolbar.
Recording a Customer Payment
To practice recording a customer payment, open the sample data file as instructed in Chapter 1 of Laura Madeira’s QuickBooks 2013 In Depth:
- On the Home page click the Receive Payments icon.
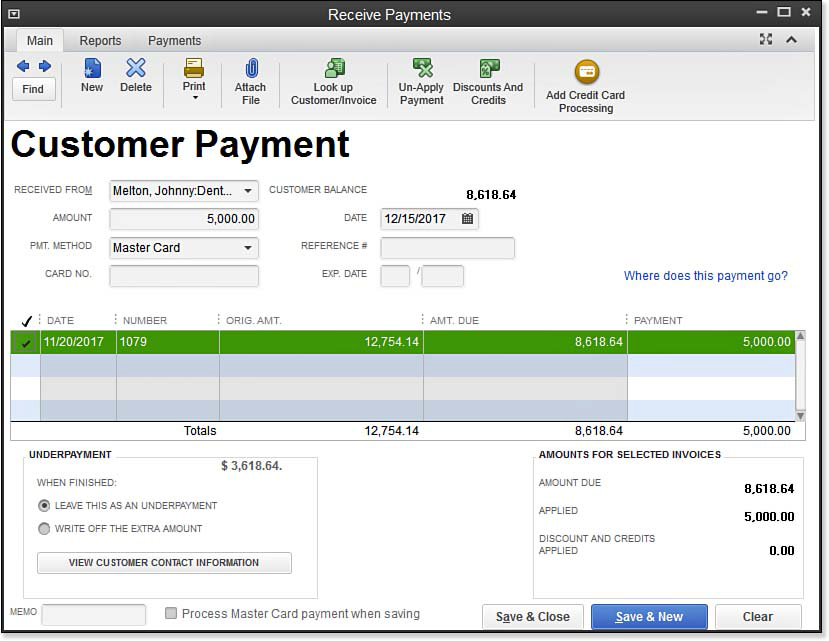
- The Receive Payments dialog box displays.
- From the Received From drop-down list, select Melton Johnny:Dental office.
- In the Amount field, type 5,000.00.
- Select Master Card in the Pmt. Method field. As shown here:
- If you selected the preference to Automatically Apply Payments, QuickBooks first tries to match the payment with an invoice for the same amount. If a match is not found, it applies the payment to the oldest invoice.
- For this practice, QuickBooks displays an underpayment message as well as a link
to View Customer Contact Information. Accept the default choice of Leave This as an Underpayment. - Click Save & Close to complete this exercise or click Save & New to practice adding more customer payments.
New for QuickBooks 2013 is the ribbon toolbar that displays at the top of most QuickBooks transactions. Access these additional features from the following tabs on the Receive Payments transaction:
- Main—Access common payment actions from the following tabs:
- Find—Click Find to open the Simple and Advanced find dialog. Or click the arrows to move forward and backward through previously recorded transactions.
- New, Delete—Complete the selected task for the currently displayed transaction.
- Print—Print a payment receipt.
- Attach File—Free document storage (local on your server or computer hard drive) of scanned documents, emails, and so on.
- Look Up Customer/Invoice—Use to find a customer or specific invoice.
- Un-Apply Payment—Clears the payment details in the grid below.
- Discounts and Credits—Opens the Discount and Credit dialog box. More details are provided in the next section.
- Add Credit Card Processing—Select this to learn about Intuit Merchant Service for QuickBooks.
- Reports—Access commonly used reports, including a Processed Payment Receipt and an Open Invoices report.
- Payments—Links to adding credit card processing or accepting eCheck processing. Get paid faster!
This Receive Payments transaction reduces the balance your customer owes you and increases the balance in your Undeposited Funds account.
Here’s an additional tip from Laura Madeira’s QuickBooks 2013 In Depth:
Often your customer will send in a payment, but will not indicate on the payment what invoice he is paying for. Click the Look Up Customer/Invoice icon on the Main tab of the ribbon toolbar for searching selected fields. From the displayed results, select any of the matches, then click Use Selected Customer or Transaction.
From Laura Madeira’s QuickBooks 2013 In Depth


