New for QuickBooks 2013, you can now include up to 50 different items in a Group Item. In previous versions of QuickBooks you could only have up to 20 individual items in a Group Item.
Unlike working with assemblies, when creating or editing Group Item, you do not assign a cost for each item or a sales price for the Group Item. The cost and sales price is calculated for you from the respective totals for each of the included items. The sales priced recorded on the invoice can be modified at the time you create the invoice, if necessary.
In this exercise, you will edit an existing Group item. Let’s begin by opening one of the sample data files:
- On the Home page, click the Items & Services icon. The Item List displays.
- Scroll down the list and select the Door Set group (near the bottom of the list in the Group section). (Optional) You can also begin selecting Door Set in the Look For box at the top of the Item List and click the Search button.
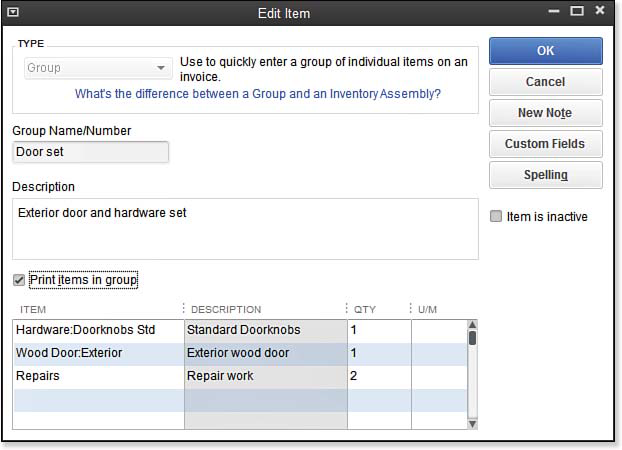
- Double-click to select the Door Set group. The Edit Item dialog box displays, as shown here:
- When working with your own data, enter a Group Name/Number of your choosing that will serve as reminder of what items are included in this Group.
- In the Description box is the desired detail that will display on a customer’s invoice. You can modify the description on the invoice if needed.
- Don’t select the Print Items in Group checkbox. This is one unique feature of working with the Group item type. When the Print Items in Group checkbox is not selected, the customer’s invoice will show only the Description from step 5.
- Currently, two items are included in the Group: Doorknobs Std and Exterior Wood Door. In the Item column, click the next available row and select the Service item named Repairs from the drop-down list.
- In the Qty. column, type 2 , assigning two hours of repair labor when installing this door.
- Click OK to close the Edit Item dialog box. You are returned to the Item List and your new group is highlighted (selected).
–> To practice using this Group item on an invoice, see the section of Laura Madeira’s QuickBooks 2013 In Depth titled “Working with Group Items,” on page 184.


