How to Add a Non-inventory Part in QuickBooks
by Laura Madeira | August 16, 2013 9:00 am
Some companies need to create non-inventory items. For example, a construction company that orders appliances for the new homeowner, but does not stock the appliances, would create non-inventory items. When non-inventory is used, the expense account on the non-inventory item record is used to record the cost at the time of purchase. These items never increase your inventory asset balances.
To practice adding a new non-inventory item, open the sample data file:
- On the Home page, click the Items & Services icon. The Item List displays.
- Click the Item button in the lower-left corner, and select New, or use the keyboard shortcut of Ctrl+N. The New Item dialog box displays.
- From the Type drop-down list that displays, select Non-inventory Part.
- In the Item Name/Number field, type Stain.
- Select the Subitem Of checkbox and then select Lumber from the drop-down list.
- Leave the boxes for Manufacturer’s Part Number and U/M Set (for Unit of Measurement) blank.
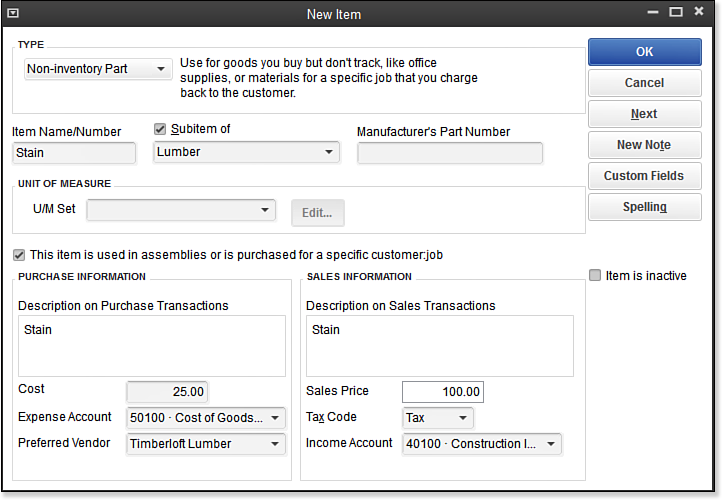
- Check the This Item Is Used in Assemblies or Is Purchased for a Specific Customer checkbox, as shown in the image below. See more details about the importance of this, in the caution that follows these instructions.
 [1]
[1]Use Non-inventory Part type for items you stock but do not sell.
- In the Description on Purchase Transactions box, type Stain.
- In the Cost field, type 25.
- In the Expense Account drop-down list, select the Cost of Goods Sold or, if you prefer, the expense account of your choice.
- In the Preferred Vendor field, select or type Timberloft Lumber.
- In the Sales Price field, type 100.00.
- Leave the default of Tax assigned in the Tax Code field.
- From the Income Account drop-down list, select the Construction Income:Materials Income account. You can also select the account by typing the account number 40100 (the account number) in this example.
- Click OK to close the New Item dialog box.
–> A word of caution: Non-inventory parts require only one account by default. This is okay if you do not purchase and sell the item. To ensure proper accounting, I recommend that when you create a non-inventory item type, you place a checkmark in the This Item Is Used in Assemblies or Is Purchased for a Specific Customer:Job box, as shown above. This enables you to assign both an expense and income account in the event you purchase and sell the item.
If you are tracking inventory in your business, non-inventory parts are also a great way to track items you consume as part of your business operations. Entering or editing each inventory item can be time-consuming and take you away from more important tasks.
- [Image]: http://www.quick-training.com/wp-content/uploads/2013/07/5.7.bmp
- QuickBooks 2013 In Depth: http://www.quick-training.com/quickbooks-2013-in-depth/
Source URL: https://www.quick-training.info/2013/08/16/how-to-add-a-non-inventory-part-in-quickbooks/